[Welcome] How to Tie your Laces
Once you’ve laced up your cleats you tie them! There are many different ways tie your shoes, and the method you learned as a kid might not be the best match for your current needs.
Do your shoelaces frequently untie themselves? You might be suffering from the “Granny Knot” problem. Or you might simply need a different knot. Read on to discover the world’s fastest knot to tie as well as a few super secure knot options.
GRANNY KNOT PROBLEM
Do your shoelaces frequently get untied? You might be the victim of the “Granny Knot” problem.
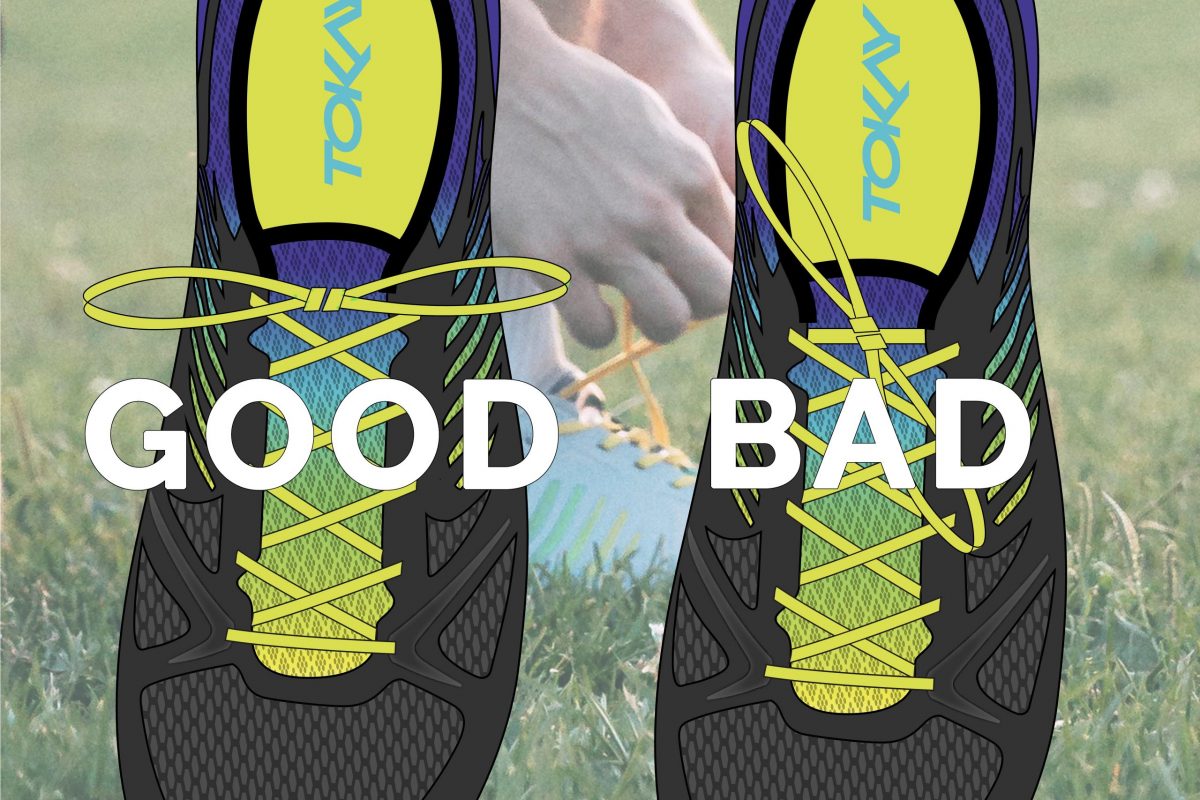
The process of tying your shoelaces usually occurs in two stages: the starting knot and the finishing bow. Each of these stages twist the laces. A balanced or symmetrical knot is created when the twisting of these stages balance each other out: left-over-right followed by right-over-left or vice versa. If the stages are twisted in the same direction (e.g. left-over-right followed by left-over-right again) an unbalanced and rotated bow results. Not only does this unbalanced “Granny Knot” look messy, it is also less secure and will more easily come undone.
 knot")
(left) balanced knot
(right) unbalanced “Granny Knot”
Your quick fix to more securely tied shoes might therefore be fixing your “Granny Knot” tendencies by reversing the direction of either your starting knot or finishing bow step. It might take some time to break this bad habit, but avoiding the “Granny Knot” will make your knots more secure.
IAN KNOT
The Ian Knot is the fastest way to tie your shoelaces (invented by Ian Fieggen of Ian’s Shoelace Site).

Follow the video above or the instructions below to try the Ian Knot for yourself.
Tie a starting knot left-over-right. Hold the lace ends as loops: the lace end on the left looped towards you over your index finger and the lace end on the right looped away from you over your thumb. Simultaneously push the loose side of the left loop through the right loop and the loose side of the right loop through the left loop. Pull the loose sides tight to complete the bow. According to Ian Fieggen, inventor of the Ian Knot, this knot takes about one third of the time to tie compared to a conventional knot.
DOUBLE SLIP KNOT / IAN’S SECURE KNOT
This knot is three times as secure as the Ian Knot.

Follow the video above or the instructions below to try the Double Slip Knot for yourself.
Tie a starting knot left-over-right. Create a loop with each loose lace end. Cross the loops so that the right loop crosses over the left loop. Wrap the end of the left loop up and over the right loop and the end of the right loop back and around the left loop. Pull both loop ends through the central hole created and pull the loops tight to create the knot.
SURGEON’S SHOELACE KNOT
My personal go-to knot: quick, easy and secure.

Follow the video above or the instructions below to try the Surgeon’s Shoelace Knot for yourself.
Tie a starting knot left-over-right. Create a loop with the right lace end. Now pass the left lace behind the right loop and bring it around and to the front of that loop. Feed the left lace through the hole created. Wrap the loop hereby created by the left lace around the right loop again and feed through the same central hole before tightening to finish the knot.
SOURCES
Fieggen, Ian. “The Granny Knot.” Ian’s Shoelace Site, 18 Oct. 2017.
Fieggen, Ian. “Tying Shoelaces.” Ian’s Shoelace Site, 18 Oct. 2017.